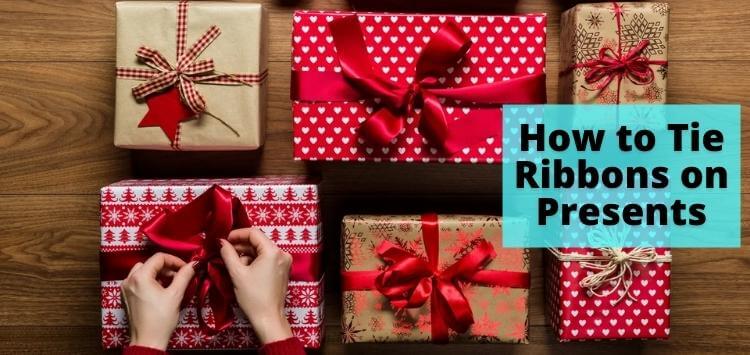
Sometimes, wrapping a present can prove more difficult than actually shopping for one. After you have purchased the perfect gift, you want your wrapping to be just as wonderful. Nothing makes a gift package look quite as special as a festive bow.
Your recipient will feel extra special too, seeing all of the time and attention you put into making their gift special.
But where do you begin? Maybe you’re not a complete pro at wrapping or making bows. No worries. This doesn’t have to be too complicated.
You’ve already come this far, so let’s give it a go. We have several options here that work for pros and beginners alike. We’ll be with you every step of the way.
To get started you’ll need to gather some basic supplies:
- Ribbon of your choice
- Scissors
Optional Items dependent on bow style:
- Clear tape
- Thin floral wire
- Stapler
Types of Ribbons for Gifts
You have many different types of ribbons to choose from for your perfect bow. Grab something you already have around the house or venture out and purchase something specific for this gift.
Pro-tip if you’re buying something new, make sure to measure your gift box or package before heading to the store. You will want enough ribbon to go all the way around at least once plus around 12-24 inches for your bow. It’s always best to have too much ribbon than not enough.
Here are some of the most common types of ribbons used for gift-wrapping:
- Wired Ribbon: Wired ribbon has a thin and flexible piece of wire sewn along each edge. This allows for easy shaping and twisting to get just the right look for your bow. The wire also means the bow will hold its shape until it’s removed. Wired ribbon also bounces back well if a gift gets squished or jostled during transport to your recipient. You can reshape it quickly and it will be as good as new. You can find wired versions of many of the ribbon options below.
- Non-Wired Ribbon: Non-wired ribbon includes any and all ribbon that does not come with a thin wire edge. This type of ribbon is easy to work with, but won’t hold a 3-D shape on its own like wired ribbon. You can find many non-wired versions of the ribbon options below.
- Paper Ribbons: Paper or raffia ribbons are generally best for food-related presents, like fruit baskets or baked goods. This is because they’re easy to remove and disposable. Paper ribbons also look great with rustic style wrapping or children’s gift packages.
- Grosgrain Ribbons: Grosgrain ribbon has a distinctive ribbed appearance. It generally has a matte finish and is very strong. This style of ribbon is ideal for many styles of wrapping.
- Satin Ribbons: Satin ribbons, also known as the all-purpose ribbons, are shiny and smooth in appearance. Satin ribbons are easy to work with and make gorgeous bows. They elevate the look of any gift and make it feel a bit fancier.
- Curling Ribbon: Curling ribbon is thin and comes in large rolls. Often it is referred to as curly-q ribbon. You can find it in matte and shiny finishes. This type of ribbon is whimsical and fun making it perfect for birthdays or children. You’re recipient won’t be able to hide their smile when they receive one of these happy bows.
- Organza or Sheer Ribbons: Sheer ribbons in a variety of colors and fabrics make for a classic touch to any gift. You can find this style in both wired and non-wired options.
- Taffeta Ribbons: Picot edge and taffeta ribbons are more inventive with their decorative looks and would go better with simple gift wraps. This way the ribbon can shine on center stage.
- Burlap: Burlap is thick and durable. A burlap bow will add a high dose of texture to your gift. Allow it to shine by pairing it with a subdued wrapping paper. The only con is that burlap can be very stiff, making it a bit tricker to work with compared to some of the other options above.
Types of Ribbon Bows
1. Tiffany Bow
Simple and elegant, this bow is suitable for any type of gift. Popularized by jeweler Tiffany & Co., you have likely seen a version of this bow before. Tiffany & Co. pair a white satin bow with their signature powder blue box. No question here, this bow is a classic.
Tiffany bows require no specifications and can be made with any kind of ribbon, although satin is preferable.
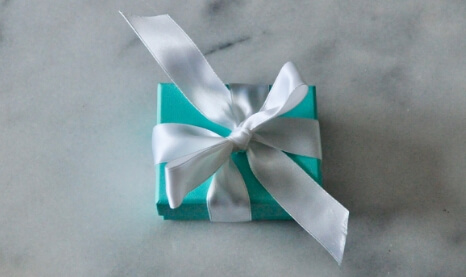
Directions:
- Lay the ribbon across the top of the present with enough length hanging free from one side to go all the way around the present.
- Loop the long piece of ribbon around the box so that it’s parallel to where you first placed your ribbon. (You just made a single wrap of ribbon around the box and both ends are now at the center on top.)
- Place your thumb at the center of the two ribbon ends. Turn the ribbon 45 degrees.
- Next, wrap the ribbon around the box for a second time, perpendicular to the first. (You have now created an X with a ribbon around the package.)
- Now, you should be back where you started with the ends on top of the package. Tighten both ends of the ribbon from the center and twist them into a two-loop bow. (Just like a shoelace.)
- Make sure that you straighten the folds neatly until they are even.
- Trim/decorate the edges to your liking, and your tiffany bow is ready. (A classic Tiffany bow has bow tails cut at an angle).
2. Small Bow
Small bows are considered to be one of the more neat and subtle bow types. We love to use a fork to make this type of bow. Thin and unwired ribbons are preferable for this knot.
One usually attaches a small or mini bow on top of the present instead of tying it directly around the package. You can always wrap ribbon around the package as desired and secure it with tape. Then add this bow to the center to cover your knot/tape. Either way works great.
Directions:
- Take your ribbon and wrap it around the outside edge of the prongs on the fork so the ends are hanging on the same side. (The prongs are covered and the tails hang out on one edge).
- Bring the back ribbon tail around to the font, crossing over the top of the front tail. Tuck the back tail through the center prong hole and pull out the back.
- With your hand still on the back tail, gently pull it tight and straight. Pull it straight up and over the front of the fork through the center prong hole.
- Move the front tail up to meet the back tail and tie in a knot.
- Gently arrange the knot for a neat look and straighten the tails.
- Carefully remove the bow from the fork by gently sliding the bow upwards.
- Trim the ends to make them even, and your bow is ready.
3. Multi Ribbon Bow
You would need multiple ribbons of varying widths and colors to make this bow. The number of strips you use and their length depends on your gift size. For this demonstration, we assume that the gift box is 14 inches down and across—we will be using three different ribbons.
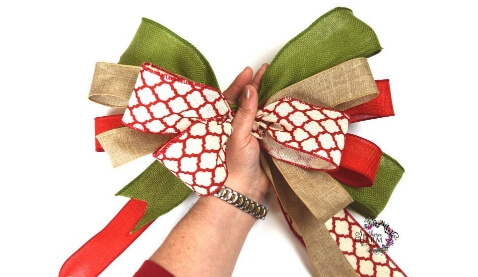
Directions:
- Start with a full roll of ribbon. Take your widest ribbon, on the roll, and measure an 8-inch length. Fold it into a loop.
- Extend the ribbon another 8 inches from that point and loop it back between your fingers at the center to make a second loop of equal size.
- Repeat this process two more times, marking 8 inches and pleating it back to your fingers.
- Once done, you would be holding four loops in your hand. Adjust them to form an X, and leave another 8-inch tail hanging loose at the bottom with the first. Cut at the 8 inch mark to remove the tail from the ribbon roll. Your first layer is ready.
- Take your second largest ribbon and repeat the first four steps, except this time, the loops and tails would be 6 inches long.
- Next, take the third ribbon and make the final layer the same as the first two with 4-inch length loops.
- Stack all three layers from the center with the largest and widest ribbon on the bottom. Add a piece of floral wire to the middle and tie them all together. Pro-tip if you can’t hold all of the bows as you go you can wrap the center of each of the three ribbon bows as you go and then add one last piece of wire at the end to cinch them all together. This works best if you have small hands.
- Tidy and shape all of the loops and trim the tails to ensure they are even.
Good To Know: How to Make a Large Bow/Ribbon Tree Topper
Ribbons on gift packages can be elegant and glamorous, fun and festive, dainty and delicate, the list goes on and on. They add just the right finishing touch to your thoughtful gift. What are you waiting for? Try a new kind of ribbon on your next gift!
Frequently Asked Questions
Should I use wired ribbon for a bow on a gift? You can use either kind of ribbon on a gift! Wired ribbon will ensure your bow holds its shape and looks extra festive. Non-wired ribbon can be just as special, but gives a softer look. The choice is yours.
How do you make a non-wired ribbon stiff? Grab a can of spray starch (you can find this in the laundry aisle) and cover your work space with old newspapers or towels. (If you have a garage or covered porch this area works great). Lay the blow down and lightly spray/coat your completed bow. Let it dry for one hour and then flip it over and repeat on the back side. If you don’t have time to wait, you can dry the bow with a hairdryer on a low setting. If you’re really in a pinch you can substitute hairspray in place of spray starch.
How large should a bow be on a present? This all comes down to personal preference and the look and style of the package you are giving. Some packages look nice with a bow that’s about ½ the width of the package, while others look best with a large bow that takes up most of the front or top of the package. The choice is yours!
How do you stick a bow on a present? You can wrap the ribbon completely around the package and tie a bow on top or you can add only a bow and attach with tape. Either works very well.