The Easter holiday is here, and it’s time to start some new traditions! Even though outdoor activities like racing and hunting Easter eggs is fun, staying indoors can be enjoyable too. This is especially true if the weather takes a turn for the worst during your planned celebrations. To keep everyone occupied and having fun, consider some Easter crafts. If the cousins and/or friends are coming over, even better. Group crafts are always the best.
There are a lot of fun Easter crafts for the whole family. Before you jump right in consider the ages of the children who will be participating and the complexity of the craft. You don’t want something that takes too long or is too difficult for your age group. The same is true for something that is too easy and not interesting. This can cause children to lose interest and not finish. We recommend having some simple crafts on hand for your crew.
To help you get started we rounded up the best-of-the-best simple Easter crafts. Each of the craft activities here are well suited for children, and adults, of all ages. However, toddler age children will likely need some assistance and support from an adult. Grab your supplies and let’s get this Easter craft party started!

1. Easter Candy Jars
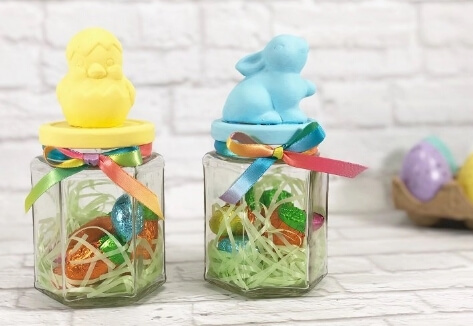
Easter candy jars are a super fun and quick craft for kids. Your littles can make these with just a few simple supplies. Bonus-these fun jars double as decorations or Easter gifts your kids can give their family and friends.
What you need?
- Small-medium size jar(s)
- Mini animal figurine
- Paintbrush
- Scissors
- Paint
- Glue gun (use only with adult supervision)
- Google eyes (optional)
- Easter grass
- Easter candy
Start by cleaning and drying your jars. Choose a mini figurine and use a paintbrush to cover with your choice of paint, Some figurines may need more than one coat. Pro-tip: choose a chick, bunny, or cute baby animal figurine to really get in the Easter spirit.
Next, paint the lid of your jar to match your figurine. Allow all of the paint to dry completely. With an adults help, carefully glue the figurine to the top of the jar. If you’re using a hot glue gun, have an adult do this step and talk with the kids about the importance of safety when working with hot materials that can cause severe burns.
For your last step, have children add festive Easter grass and candies to the inside of the jar. Voila! A fun and festive little decoration or gift.
2. Neon Puffy Paint Easter Eggs
Whether it’s an outdoor egg hunt or indoor decoration, Easter eggs are a must-have. A fun way to mix things up this year is to use puffy paint to decorate real or plastic eggs. The craft is a straightforward and fun activity that will engage the kids’ painting skills while giving them room for creativity. This one is fun for all ages and can be done indoors or out.
What You Need?
- Hard-boiled eggs OR plastic eggs
- Puffy paint
- old newspapers, towels or paper to protect your surfaces
Start by preparing your space. Make sure your surfaces are covered with old towels or newspapers so they won’t get paint on them. Next, spread out your eggs and allow kids to get creative with their puffy paints. Make sure you allow plenty of dry time before you use the eggs for any Easter activities.
These adorable eggs will be fun to add to your hunt or you can use them as decorations.
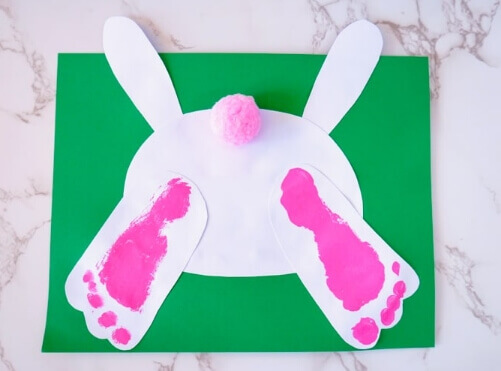
3. Bunny Footprint Easter Craft
As the little ones are engaging their creative side this Easter, it is also a great time for you to make a keepsake. Have them create bunny foot print art using their own feet and you’ll always be able to remember them at this fun age forever. A win-win!
Bonus-this one would be fun to frame and use as Easter décor year after year!
What You Need?
- Piece of cardstock or construction paper
- Black marker or pen
- Scissors
- Glue
- Paint
- Paintbrush
Start by drawing two bunny ears, one large oval for the bunny’s body, and two bunny shaped feet (large enough for your child’s foot to fit inside). Next, have your child help you cut out the shapes if they are old enough. Pro-tip, choose a lighter color paper with darker paint so the footprints really pop!
After that, make sure you have covered your work space to protect it from paint. Gently paint the bottom of your child’s foot with a paintbrush and have them stand or press their foot onto one of each of the bunny feet your child cut out earlier. Let the paint dry completely.
Last, glue all of the cut out pieces to your card stock or construction paper. Add a festive cotton ball as a tale! Frame or hang and enjoy!
4. Easter Bunny Mask
Who says masks are only for Halloween? The Easter bunny mask is one of those engaging crafts that will keep the kids busy long after they are done making them.
What You Need?
- Construction paper or card stock
- A paper plate
- Glue
- Scissors
- Yarn OR popsicle stick
Start with plain construction paper. Have the kids draw two bunny ears. They can decorate them and then cut them out. Have them glue the bottom of the ears to top of their paper plate. Pro-tip if you’re using construction paper make the bunny ears shorter or they won’t stand up straight. Card stock works the best to stand straight and hold its shape. Wait for the ears to dry.
Next, have the children cut out eye holes. After that, they can decorate their paper plates to look like a bunny face. Lastly, glue a popsicle stick under the chin or punch holes and add string to tie the mask on each child. Whichever works best for your crew. Get ready for some serious bunny antics!
5. Personalized Bunnies
This is a fun one that you can save and use as a decoration for years and years as well.
What You Need?
- Small photo of your child’s face
- cotton balls
- construction paper or card stock
- markers
- glue
- scissors
You will want to start by cutting a circle around the photo of your child’s face. Set it to the side. Up next, draw an oval for a bunny body, two bunny feet, and one round circle head with two bunny ears. Draw these all as one shape and cut out or, draw each piece separately and assemble with glue.
Have the kids glue their faces to the circle head making sure there is plenty of room around the edges for cotton balls. Next, evenly distribute and completely cover the bunny’s body with cotton balls, using glue to attach. Allow it to dry completely. Frame of hang to display! So cute!
Final Thoughts
Easter holidays bring back fond childhood memories for grown-ups. Similarly, it is time for your kids to have fun and make lifelong memories too. Crafts and spending time together creating fun gifts and keepsakes are a great way to do this. We hope you enjoy these finished pieces for years and years to come.