Who else loves dressing up their nails for different holidays? We do too! After Valentine’s Day we like to move into celebrating all things spring and that includes St. Patrick’s Day. A fun and fashionable way to celebrate is with a festive manicure.
You can achieve your own unique look by visiting a nail salon or giving it a go on your own. Either way, you’ll need some inspiration. That’s where we come in. We scoured the internet from top to bottom to bring you some of the most fabulous St. Paddy’s day manicure looks.
Don’t worry, each look can be customized to suit your own personal style. Add in extra details or scale back from these ideas. Let your creativity run wild.
Pair your new manicure with a festive St. Paddy’s Day graphic tee and you’re all set to hit your local parade or festival. Can’t be there in person? You can catch a few parades on TV this year.
Once you’ve looked through all of the nail art inspiration, check out our Frequently Asked Questions at the end for some extra tips and tricks.
St Patrick’s Day Nail Inspiration
Get ready to join in the celebration this spring with a fresh and fun St. Patrick’s day inspired manicures. You can do this with polish or nail polish stickers. Go to your local nail salon or conquer one of these looks on your own.
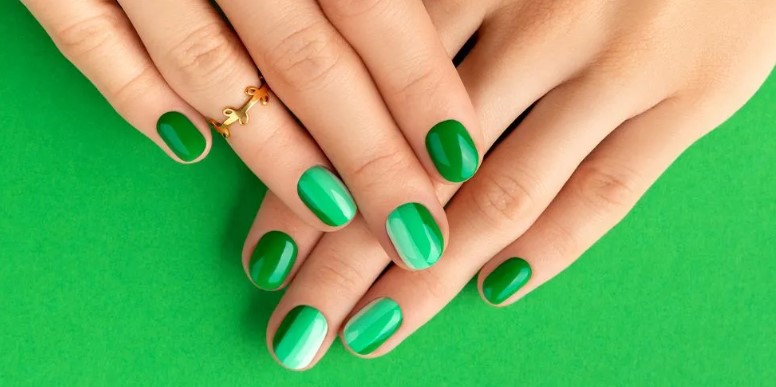
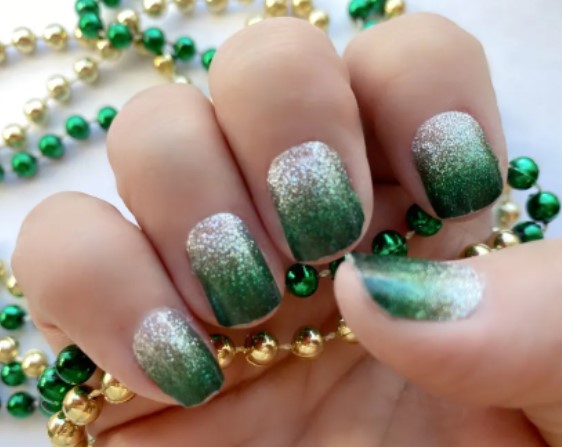
1. Green and Gold Hues
Luscious green is the most popular festive color to wear on St. Patrick’s Day. You can add sparkling gold nail paint to make things a notch higher.
You can create either alternate shimmery green and sparkling gold on each finger or create a gradient by mixing two colors on the same nail.
This simple yet attractive nail polish array is excellent for people who don’t want to apply any patterns or stickers on their nails. You’ll need two nail colors, shimmery, matte or glossy green and glittery gold.
Go for only green on your thumb and ring finger. Add gold or an ombre green to gold on the other fingers. Alternating the nails provides added interest and really makes your nails pop.
2. Glittery Green Top Coat
Here is something simple yet attractive to try this St. Patrick’s Day for beginners. If you are not practiced with intricate patterns or detailed designs., you will love this elegant nail option.

Start by using a clear base coat. Add a solid color such as white, or pale green on top. If you want to go more subtle skip this step and leave your nails with a clear base coat only.
Next, use a glittery green nail polish starting from the base or middle part of the nail till the end. The final look of this nail art looks like green and glitter ombre.
Pro-tip: Apply a double coat of glittery nail polish at the edges of the nails, for a shimmery ombre green effect.
3. Green and White Stripes
For everyone looking for minimalistic nail art with green and white stripes is what you are looking for this St. Patrick’s Day. Firstly apply a sheer base coat all over your nails. Then, apply white nail polish on one half of the nail and green nail polish on the other half. Pro-tip use tape to get a crisp line. If you want more of an ombre in the middle-skip the tape.
If you want something a little more advanced try this stamping technique for your stripes from the NailChronicle.
4. Pot of Gold
Adding a pot of gold to one or more nails on each hand is a fun and whimsical touch. If you aren’t well practiced, this one is best left to the pros. Unless you can find a fun nail sticker. We love the 100% nail polish gloss manicure sets from Dashing Diva.
If you do set out to do this one on your own, you’ll need three nail polish colors; gold, white or black for your pot and a base color. We recommend adding a pot of gold to only 1-2 nails per hand. This way you can bring a bit more attention to this extra special detail.
For a an easy to follow pot of gold (and rainbow) tutorial check out this one from cutepolish.
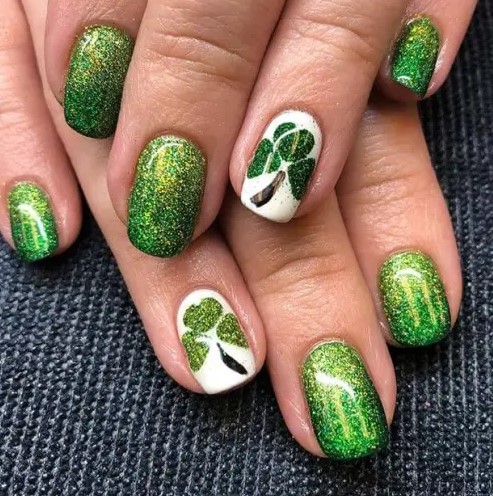
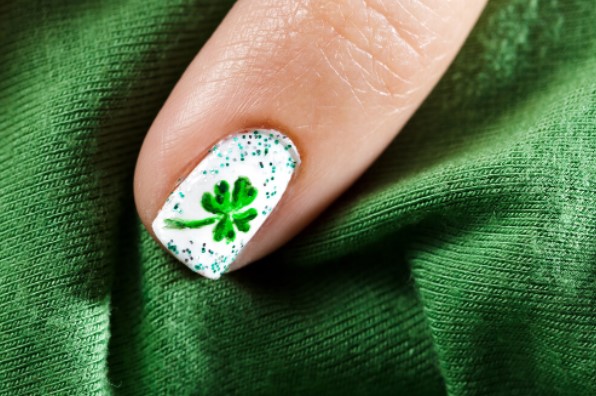
5. Shamrocks
This one is also good for beginning nail artists. Start with a clear base coat. Add a shimmery or matte white polish on top.
Next, use a small brush to paint a shamrock on a few nails on each hand. Don’t skip the top coat, once the base and shamrocks are completely dry, to help your details last longer. This is a fun design to pair with a glittery accent nail or solid manicure too.
6. St Patrick’s Day Nail Art Decals or Stickers
Another fun way to embellish your nails this St. Patrick’s Day is by applying some beautiful, premium-quality nail art decals. You can find a wide range of nail art decals specifically designed for St. Patrick’s Day. Most of these designs incorporate the festive green color, shamrocks, and rainbows.
These decals come in various sizes and materials at a very affordable cost. Applying these art decals to your nails is easy and simple. You can use these art decals on your natural and artificial acrylic nails. However, if you are using only these decals on natural nails, don’t forget to apply a clear base coat or nail polish color beforehand.
You can generally find decal stickers for your nails online, at your local salon, or at your local craft store. We love the designs and long-wearing durability of Dashing Diva 100% nail gloss strips. They have some really fun designs for St. Paddy’s Day.
7. St. Patrick’s Day Nail Polish Wraps or Strips
Give your nails a quick manicure and makeover this St. Patrick’s Day with beautifully designed nail polish wraps. Nail wraps are a quick fix to get professional quality nail art at home. These wraps are available in an overwhelming range of cute and interesting designs. We love the quality of Dashing Diva because they are 100% nail polish strips. So they look and act like nail polish while you’re wearing them.
Application instructions are included with the manicure sets. However, to give you an idea, wash your nails with soap and water, and then thoroughly clean them with nail polish remover or rubbing alcohol. Then, choose the right size as per your fingernail and tear off the wrap from the cover.
Apply the nail wrap on your nail and gently press it until it perfectly fits all over it. After that, file excess nail wrap to get your desired nail shape. Pro-tip: use a glass nail file for a smooth finish that won’t snag or rip the wrap.
8. Polka Dots and Clovers
Polka dots are always in fashion. Having a mix of polka dots and shamrocks will make for a fun and festive manicure.
For this nail art, you will need green and white nail polish and a thin paintbrush, and that’s it. You don’t need to be a designing pro to pull off this nail art. First, apply green nail polish on your nails, leaving one nail per your preference.
Apply white nail polish on the remaining nail, and draw a little cloverleaf on this nail with green nail polish.
Next, take white nail polish and draw little dots on the polished green nails. Pro-tip: beginners try using a toothpick to make the small polka dots.
Finally, apply your choice of matte or gloss nail polish topcoat, and voila, you are ready to be a part of all the fun activities this St. Patrick’s Day.
9. Rainbows
The rainbow pattern is a stand-out addition to any St. Paddy’s Day manicure. First, apply green nail polish on all your nails except one to get this nail design. You can choose plain green or shimmery green; both will look beautiful.
On the remaining nail, draw a rainbow pattern using a thin brush or toothpicks. Don’t worry if the lines are not perfect.
You also pair the rainbow pattern with polka dots, or a gold glitter on your other fingers. Go with whatever combo works best for you.
10. Irish Accents
The best St. Patrick’s Day nail inspiration is to go with dainty clovers on top of nude nail polish. This simple yet stylish nail art will make the Irish symbol of luck really pop.
First, apply the nude base coat on your nails, and then using a thin paintbrush, draw a couple of clover leaves on the nails. Pro-tip: use a toothpick in place of a small brush if you don’t have any.
Add a shamrock to each nail or only a few on each hand. The nail art will look super cute, fun, and beautiful both ways.
Final Thoughts
If you are someone who loves to get your nails perked up, this St. Patrick’s Day is another great reason to style your nail with festive hues. The internet is flooding with fun and interesting St. Patrick’s Day-themed nail art inspiration. You can find numerous St. Patrick’s Day Nail stickers, wraps, decals, glitters, etc.
You can get the nail art done by a professional or try some fun designs yourself. The most important thing is to have fun and let your creative side shine through. Do this and you’re certain to love the results.
So what are you waiting for? Get started on your nails today!
Frequently Asked Questions
Do I need a base coat before applying nail polish? Yes! You need a base coat to protect your nails from staining and other potential harmful side effects from polish. Look for one that has nutrient rich ingredients to help preserve the health of your nails as well. Using a base coat also gives your nail color something to hold onto and will help your manicure to last longer.
Is a glass nail file better than a traditional emery board? This is a personal preference. However, we absolutely lean toward a glass nail file. It is gentler on nails and will last forever. We love to use them with nail strips as they prevent snagging and chipping etc.
What is a nail polish top coat? A top coat is a clear coat of nail polish to protect your manicure from wear and tear, i.e. chipping etc. You can find top coats in glossy or matte finishes.
Can I use a top coat as a base coat? You technically can, but it is not the best route. Base coats and top coats are formulated differently. Base coats are designed as a primer for color and to protect your nails. Top coats create a hard protective layer from the elements and daily wear and tear.