Decorating Easter eggs is one of my favorite springtime activities. Is it a family tradition in your home too? There are endless ways to decorate your eggs from traditional dye kits, to mod podge, to stickers and countless varieties in between. Depending on whether you’re using an authentic hard-boiled egg or a plastic version, these methods may vary.
One of our new favorite ways to color hard-boiled eggs is using shaving cream. It’s unique, fun and not as messy as it sounds. If you have young ones, or even teens, at home this one is a real hit.
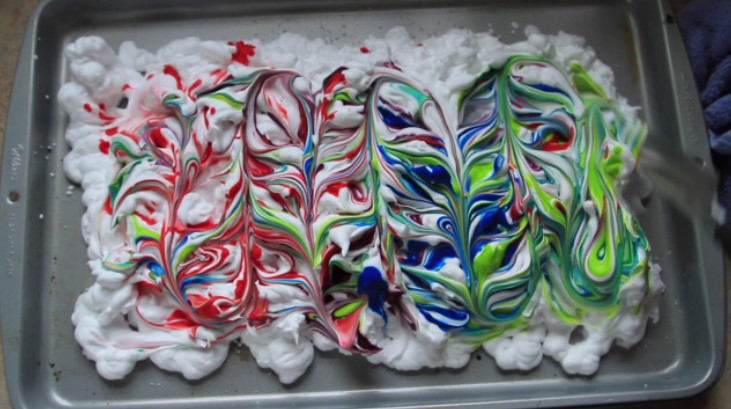
The final result is a beautiful marbled or tie-dye effect. No two eggs will come out looking exactly the same.
The best part? Set-up and clean-up is a real breeze. You only need a few basic supplies that you likely already have around the house. That means you can save some time and money with this fun dying technique.
If you’re on the fence on whether or not to use real eggs or plastic eggs this year we can help. Don’t miss our feature Easter Showdown Real Eggs vs. Plastic Eggs.
Before you begin be sure to prepare your eggs for dyeing. Grab your supplies and then follow our 10 quick and easy steps for dying your Easter eggs with shaving cream.
Supplies:
Gather these items before you get started on this colorful egg project:
- 1 dozen or more hard-boiled eggs
- 1 or more cans of regular shaving cream
- 1 baking sheet, baking pan, or muffin tin (or 1 per child if desired)
- Parchment paper or wax paper
- 1 box of food coloring
- Old towels, newspapers or parchment to protect your work space
- Latex gloves or spoons
- Paper towels
Let’s Dye Those Eggs
- Step 1: Start by preparing your eggs. Click over and check out The Best Way to Prep Easter Eggs Before Dyeing and then meet us back here. Do not attempt to dye fresh/raw eggs.
- Step 2: Prepare your space. Cover your table or countertop with old towels or dish towels, newspapers, wax paper or parchment paper. You want to protect your work surface from stains.
- Step 3: Gather your supplies to your work surface.
- Step 4: Apply a one inch-thick layer of shaving cream to the baking sheet and spread it evenly. Use the same process for a baking pan or muffin tin. If you want to go with a different thickness of shaving cream go for it. Do what works best with your designs. If you want to keep it simple-go with one inch.
- Step 5: Take the dye you’re using and create a design of your preference on the sheet of cream. If you don’t consider yourself to be particularly artistic, you could randomly drop the color onto the cream and use a toothpick to swirl it around and make fun patterns. You can use more than one color at a time. If you’re using a muffin tin experiment with different colors in each muffin space.
- Step 6: Now, carefully pick up your hard-boiled eggs and place them on the baking sheet, down in the pan or in each muffin cup. We recommend handling one egg at a time. Make sure to wear gloves to avoid any stains if you’re using your hands. Use a spoon if you don’t plan to touch the eggs.
- Step 7: Gently roll the eggs around in the cream to coat them thoroughly. You can experiment with different designs here by dipping one side of the egg in one color and the other in another color. Let your creativity run wild!
- Step 8: Allow the eggs to rest in the shaving cream mixture for at least 10 minutes for lighter colors, 90 minutes for medium tones or overnight if you want bright vibrant colors.
- Step 9: Once done, place the eggs onto a paper plate or a clean baking pan covered in parchment or wax paper. Allow for 20 minutes of dry time and keep the eggs stationary.
- Step 10: Wipe the excess cream off the eggs using paper towels or old dish towels. Your dye may stain, so be careful what you choose for this step.
Enjoy your eggs! Use them as decorations or for a fun Easter egg hunt!
There are various ways to dye your Easter eggs but using shaving cream is probably the quickest and one of the most colorful ways. All you would need to do is use dye to create patterns in a layer of shaving cream and then coat your eggs in the cream. After twenty minutes of drying, you are all set to have a colorful and hassle-free Easter.
After the fun is over this Easter don’t forget to properly dispose of your eggs. There are a few ways you can reuse your eggs as well. Don’t miss What to Do With Leftover Easter Eggs.
Caution: We do not recommend eating any eggs you have decorated with shaving cream. Shaving cream is not food safe or suitable for consumption by humans or animals. This is true even if you remove the shell. The shell is porous and some of the shaving cream may have penetrated all the way through. Also be certain you used a food-safe food coloring as opposed to paint or other dyes for the color. Better safe than sorry.
If you really want to eat your eggs after Easter, try using Whipped Cream in place of the shaving cream above. Be sure to store them in your refrigerator so they stay fresh and safe to consume.
Frequently Asked Questions:
Can I eat eggs after dying them with shaving cream? No. Shaving cream is not suitable for human or animal consumption. You should not eat eggs that have been dipped in shaving cream. Egg shells are very porous, which is why they dye and take color so well. This also means shaving cream can penetrate the shell making the hard-boiled egg inside, unsafe to eat.
What should I use to color my hard-boiled eggs if I want to eat them later? If you really want to eat your hard-boiled Easter eggs, dye them with food safe food coloring and whipped cream. After coloring, be sure to store your eggs in the refrigerator and do not leave them out for more than 2 hours at a time. If they are left at room temperature for too long they will become unsafe to eat.
Can I eat eggs after dying them with whipped cream? Yes, you may eat eggs that have been colored using whipped cream or cool whip. Just be certain that the dye used was a food safe dye or gel product. Both the dye and the cream are equally important to check for food safety.
Can you dye brown eggs for Easter? Absolutely! However, the colors will appear differently on eggs with brown shells v. those with bright white shells. Still just as fun and exciting. We say go for it!
How early can I dye Easter eggs? Ideally, you will want to dye Hard-boiled eggs no more than 3-4 days before you plan to use them. Hard-boiled eggs generally last up to 7 days in the refrigerator. Give your eggs at least 24 hours to dry and rest before you plan to use them as decorations or as part of a hunt. Keep them refrigerated when not in use.
Can I use apple cider vinegar instead of white vinegar for Easter eggs? Yes! Either type of vinegar will work well for dying Easter eggs. Both of these vinegars have similar acidity levels which is what you need to help your shells hold color.
Can I use gel food coloring for Easter eggs? Absolutely! Gel food coloring should work the same way sas liquid food coloring does with shaving cream or whipped cream. However, we have found that gel food coloring tends to offer a more vibrant color.