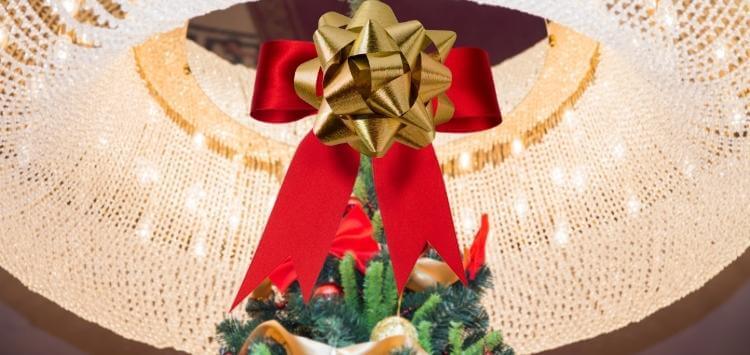
Christmas may be months away, but who says you can’t use decorative trees on other holidays like Easter, St. Patrick’s Day, and the Fourth of July? Large bows or ribbons are a new trend, and people like their elegant look that adds more color to holiday traditions.
However, store-bought ribbon tree toppers won’t do. Some are too plain or extravagant, spoiling your perfect holiday color motifs. Contrarily, DIY bows/ribbons are more customizable. Instead of looking for limited choices in the market, you can mix and match colors and designs from various ribbons. Plus, you have the freedom to control the ribbon’s size.
It may cross your mind that decoration as impressive as this must be challenging to make, but no. See for yourself and read this guide on how to make a large bow/ribbon tree topper.
How to Make a Large Bow/Ribbon Tree Topper (Step by Step)
Step 1: Gather Materials
To start, collect all the things you’ll need in the project. The most obvious and important is the ribbon. We highly recommend using a 2.5-inch wired ribbon to attain a fluffy look on the large bow and a flowy streamer below it. It’s also preferable to have two ribbons (or three), at least a solid colored and patterned one for an aesthetic look.

Next, you’ll need a wire, and it’s up to you which type you’d like for securing the ribbons. Zip tie works best in keeping the loops in place, but try a pipe cleaner if you prefer a more decorative option. A wrapped floral wire is a good alternative, too. Then, depending on which wire you’re using, you’ll also need pliers or a wire cutter.
Lastly, keep a pair of scissors handy once you finish creating loops and knots (you’re also going to need this later for the ribbon’s tail).
Step 2: Form a Loop With Your Ribbon
For easier workflow, it’s best to unwind all ribbons from the spool. If your ribbon has a “bad” side and a “good” side, stack the two ribbons together to face the same direction.

Again, depending on how large you’d like the ribbon to be, form a loop with the ribbon. Then, secure the loop’s base with your other hand. As a reference, a seven-inch long loop would do.
Then, do the opposite on the other side, making a number eight (8) sign, twisting the ribbon whenever necessary to reveal the pattern. Make sure each loop is even by comparing the length of each side. Here, it’s crucial to pinch and hold the center tightly, or the bow would fall apart.
Repeat the process until you get the desired thickness. Four loops are enough on one side for three ribbons, totaling eight loops on both sides. In contrast, thinner materials like Organza may need 18 loops on one side (32 on both). The ribbon may not be similar to the look you’re aiming for yet, but we’ll get to that later.
Step 3: Cinch the Ribbon
In this part, you can now let go of pinching the center of your bow after fastening the loops with a wire. Remember to tie it as tight as possible because the next step requires tugging and may ruin a ribbon with a flimsy-tied wire. You may or may not leave an extra portion of the wire for the tail.
Step 4: Fluff Until You Achieve the Desired Shape
This step requires patience if you make your bow/ribbon thicker than usual. Tug the loops apart and bring some to the front. Strive to make the ribbon look spherical and not flat. Continue pulling and rearranging until every loop occupies all spaces.
After this step, you’ll notice that your large bow/ribbon will start coming together and looking more decent and better, but we still have a few more steps.
Step 5: Add the Tail
Measure the tail length by placing it side-by-side with the tree’s highest point to the lowest. Keep a few inches just in case as the ribbon will shorten when curled and hung on the branches. You’ll need four tails (or six if you have three ribbons), so double that length. Then, do the same with the second ribbon.
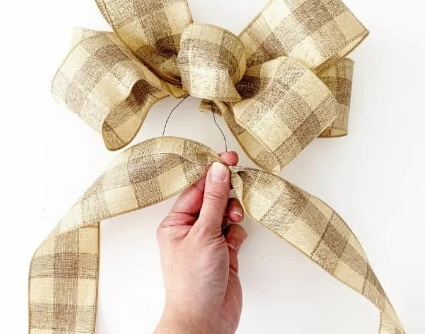
Fold the ends of the ribbon and cut a diagonal line for an additional appeal.
If you keep a certain length of your previous wire intact, tie the ribbon’s tail there. Otherwise, cut another wire, grab two loops at the back, and string the ribbon.
Step 6: Secure Your Ribbon on the Tree
Tie a wire or pipe cleaner around the bow and position it on the tree. Then, hang the tails on branches while ensuring each has proper spacing.
Looking for Some Unique Tree Topper? Have a Look: 25 Unique Christmas Tree Toppers
Final Thoughts
Making a large bow/ribbon may be hard at first glance. However, with proper instructions like what we mentioned, even a total beginner can master this art in minutes.
To sum it up, you need ribbons, wires, cutters, and scissors to start. Then make a loop and secure the ribbon with a wire. Fluff the bow until you get the desired shape. Finally, attach the streamer and mount it on your tree. Voila! You now have a decorative tree topper to reflect the family’s festive mood.